You can specify the file name for the table name.
The column names are automatically assigned as c1, c2 and so on.
 $ qhs "SELECT c4,c1 FROM ./wc_out.txt WHERE c4 <> 'total' ORDER BY c1 DESC"
Main.hs 118
File.hs 66
Option.hs 61
Parser.hs 51
SQL.hs 45
The qhs command can read the table from the standard input as well.
$ wc *| qhs "SELECT c4,c1 FROM - WHERE c4 <> 'total' ORDER BY c1 DESC"
Main.hs 118
File.hs 66
Option.hs 61
Parser.hs 51
SQL.hs 45
You can use -H flag to make qhs regard the head line as the row of column names.
 $ cat basic.csv
foo,bar,baz
a0,1,a2
b0,3,b2
c0,,c2
 $ qhs -H "SELECT * FROM basic.csv WHERE bar IS NOT NULL"
a0 1 a2
b0 3 b2
You can use the basic SQL operations; GROUP BY, ORDER BY, LIMIT and COUNT(*).
 $ ps -ef | qhs -H -O "SELECT UID,COUNT(*) cnt FROM - GROUP BY UID ORDER BY cnt DESC LIMIT 3"
UID cnt
503 102
0 86
89 3
You can also use other SQL operations like JOIN, UNION and sub-query.
The command helps you deal with multiple CSV files.
Please refer to qhs --help for further options.
The command respects the behaviour of the original q command.
 $ qhs --help
qhs - SQL queries on CSV and TSV files

Usage: qhs [-H|--skip-header] [-O|--output-header] [-d|--delimiter DELIMITER]
           [-t|--tab-delimited] [-p|--pipe-delimited]
           [-D|--output-delimiter OUTPUT_DELIMITER] [-T|--tab-delimited-output]
           [-P|--pipe-delimited-output] [-k|--keep-leading-whitespace]
           [-z|--gzipped] [-q|--query-filename QUERY_FILENAME] [QUERY]

Available options:
  -h,--help                Show this help text
  -v,--version             Show the version of the command.
  -H,--skip-header         Skip the header row for row input and use it for
                           column names instead.
  -O,--output-header       Output the header line.
  -d,--delimiter DELIMITER Field delimiter. If not specified, automatically
                           detected.
  -t,--tab-delimited       Same as -d $'\t'.
  -p,--pipe-delimited      Same as -d '|'.
  -D,--output-delimiter OUTPUT_DELIMITER
                           Field delimiter for output. If not specified, the
                           argument of -d DELIMITER is used.
  -T,--tab-delimited-output
                           Same as -D $'\t'.
  -P,--pipe-delimited-output
                           Same as -D '|'.
  -k,--keep-leading-whitespace
                           Keep leading whitespace in values. The leading
                           whitespaces are stripped off by default.
  -z,--gzipped             Assuming the gzipped input.
  -q,--query-filename QUERY_FILENAME
                           Read query from the provided filename.
Lotteries are an excellent use case for Ethereum. This repo will show the process flow diagram of lotteries in Ethereum and Hyperledger to show it’s difference
Ethereum
Following are the process diagrams of the lottery games.
Simple Lottery – This simple-lottery is nonrecurring, uses blockhashes for random numbers, and has only
one winner.
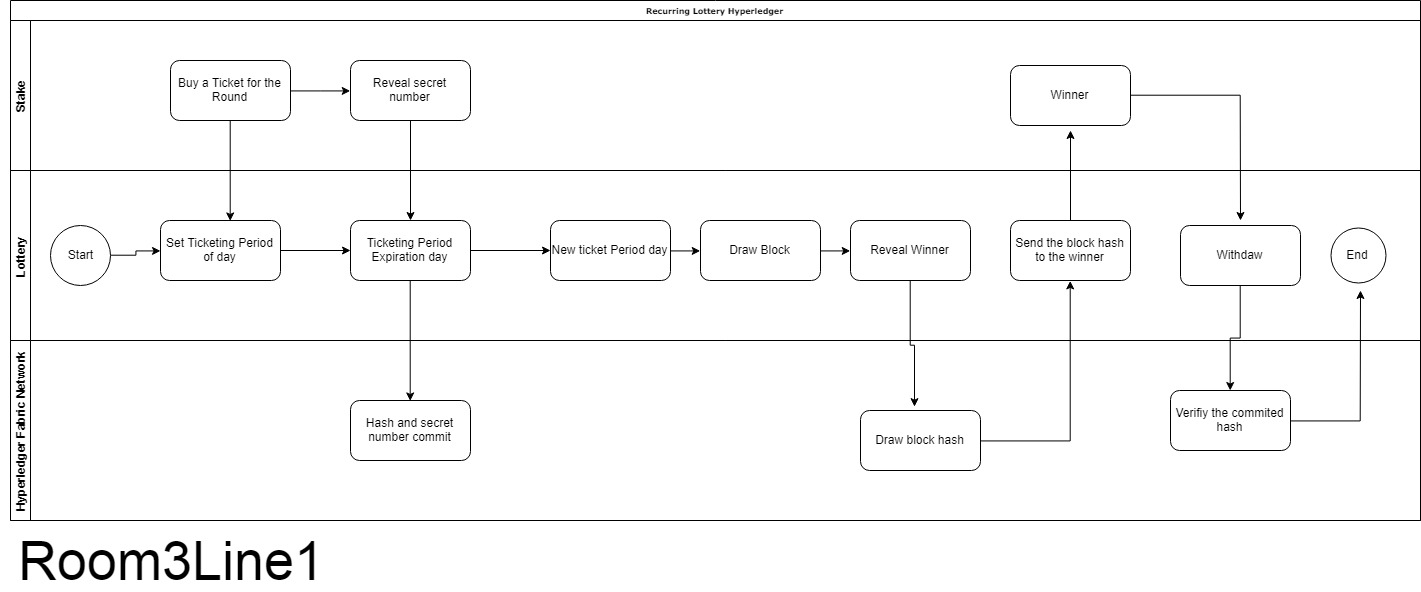
Recurring Lottery – The
recurring lottery will occur in rounds so that a new prize pool is started every
time the old one closes. It will also allow users to purchase multiple
tickets in one transaction instead of just one and add a couple of security
improvements
RNG Lottery – The RNG Lottery is non-recurring, the numbers are randomly generated. Also after the round all users must reveal their tickets or else it will drop.
Powerball – In Powerball, the user picks six numbers per ticket. The first five
numbers are standard numbers from 1–69, and the sixth number is a
special Powerball number from 1–26 that offers extra rewards. Every three
or four days, a drawing is held, and a winning ticket consisting of five
standard numbers and a Powerball number is picked. Prizes are paid out
based on the number of winning numbers matched on your ticket.
Hyperledger
Following are the process diagrams of the lottery games.
Simple Lottery – The Simple Lottery in the Ethereum was translated into Hyperledger platform and every stake need to register into network to participate in the lottery hyperledger network.
Recurring Lottery – The Recurring Lottery is a lottery that reccurs in rounds so that a new prize pool is started every time the old one closes. The recurring in hyperledger the stake need to be a member in the hyperledger network to join in the lottery.
RNG Lottery – The RNG Lottery was a counter park of Recurring Lottery, because the RNG Lottery does not reccur every round and only has one winner and the stake need to be a member to participate in the network
Power Ball Lottery – The Power Ball Lottery is different from the other lotteries because the power ball draw the ticket every three or four days unlike in other lotteries that you can set the ticket round for the day, also the stakes need to be a member in the network to participate in the power ball lotttey.
Contributors:
Use cases is based from a book that is tutorial for building games using ethereum
AzureMobileClient.Helpers is a lightweight toolkit for using the Microsoft Azure Mobile Client. It provides a set of abstractions and base classes that are based originally on the Samples from Adrian Hall, along with a few tweaks to follow best practices with an interface based design.
Note that this library has been aligned with the Microsoft.Azure.Mobile.Client and is offered using NetStandard1.4 and as such is not compatible with traditional PCL projects. For this reason, it is recommended that you check out the Prism Templates I have available for dotnet new which use a NetStandard1.4 common library for the shared code.
The following examples are based on using DryIoc in a Prism Application:
protectedoverridevoidRegisterTypes(){// ICloudTable is only needed for Online Only dataContainer.Register(typeof(ICloudTable<>),typeof(AzureCloudTable<>),Reuse.Singleton);Container.Register(typeof(ICloudSyncTable<>),typeof(AzureCloudSyncTable<>),Reuse.Singleton);Container.UseInstance<IPublicClientApplication>(newPublicClientApplication(Secrets.AuthClientId,AppConstants.Authority){RedirectUri=AppConstants.RedirectUri});Container.RegisterMany<AADOptions>(reuse:Reuse.Singleton,serviceTypeCondition: type =>type==typeof(IAADOptions)||type==typeof(IAADLoginProviderOptions));Container.Register<IAzureCloudServiceOptions,AppServiceContextOptions>(Reuse.Singleton);Container.RegisterMany<AppDataContext>(reuse:Reuse.Singleton,serviceTypeCondition: type =>type==typeof(IAppDataContext)||type==typeof(ICloudService));Container.RegisterDelegate<IMobileServiceClient>(factoryDelegate: r =>r.Resolve<ICloudService>().Client,reuse:Reuse.Singleton,setup:Setup.With(allowDisposableTransient:true));Container.Register<ILoginProvider<AADAccount>,LoginProvider>(Reuse.Singleton);}
publicclassAwesomeAppCloudServiceOptions:IAzureCloudServiceOptions{publicstringAppServiceEndpoint=>"https://yourappname.azurewebsites.net";publicstringAlternateLoginHost=>string.Empty;publicstringLoginUriPrefix=>string.Empty;publicHttpMessageHandler[]Handlers=>newHttpMessageHandler[0];}publicclassAwesomeAppCustomerAppContext:DryIocCloudAppContext{publicMyAppClient(IContainercontainer)// We can optionally pass in a database name:base(container,"myDatabaseName.db"){}/* * NOTE: This is architected to be similar to Entity Framework in that * the CloudAppContext will look for properties that are ICloudSyncTable<> * so that it can register the Model type with the SQLite Store. */publicICloudSyncTable<Customer>Customers=>SyncTable<Customer>();publicICloudSyncTable<Invoice>Invoices=>SyncTable<Invoice>();publicICloudSyncTable<InvoiceItem>InvoiceItems=>SyncTable<InvoiceItem>();publicICloudTable<Feedback>Feedback=>Table<Feedback>();}publicclassCustomer:EntityData{publicstringFirstName{get;set;}publicstringLastName{get;set;}publicstringEmail{get;set;}}publicclassInvoice:EntityData{publicstringCustomerId{get;set;}}publicclassInvoiceItem:EntityData{publicstringInvoiceId{get;set;}publicstringItemId{get;set;}publicintQuantity{get;set;}}publicclassFeedback:EntityData{publicstringMessage{get;set;}publicstringStatus{get;set;}}
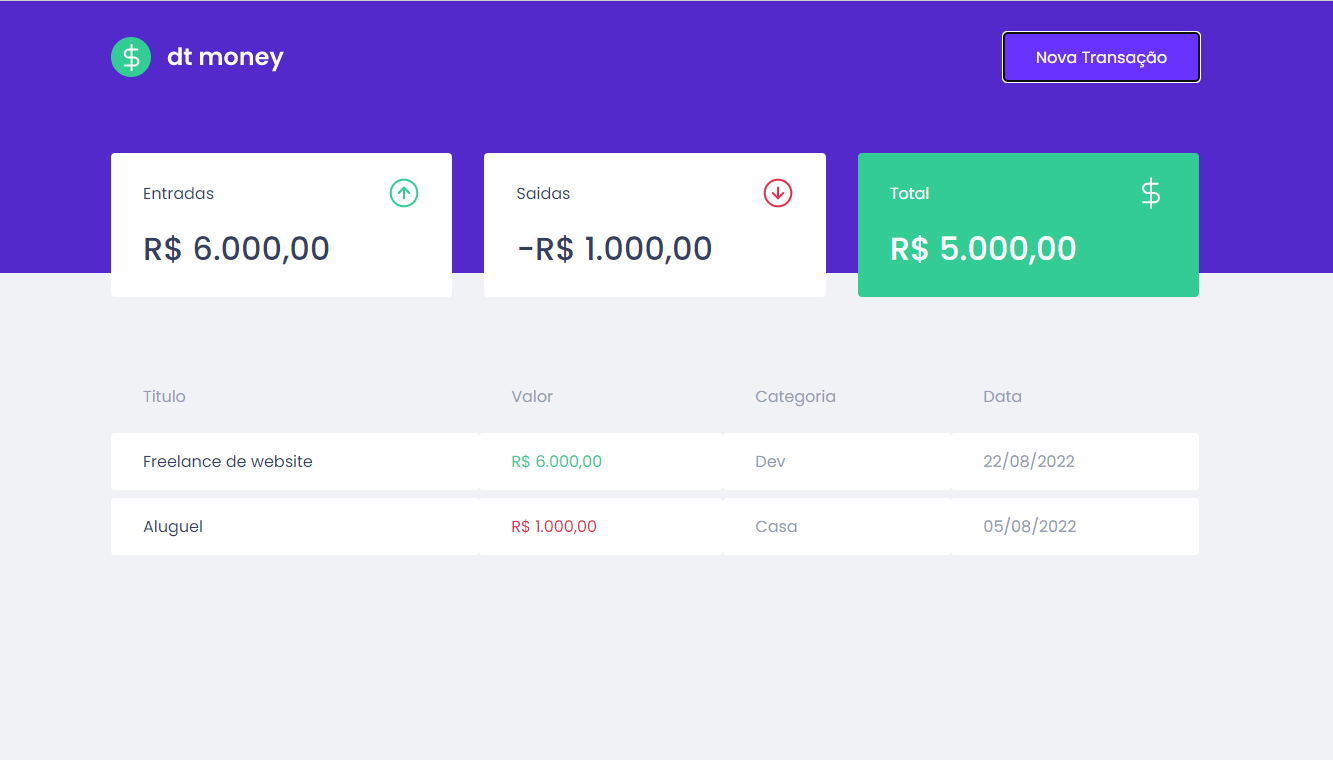
O DT Money é um projeto desenvolvido no programa Ignite da Rocketseat.
Ele funciona como um gerenciador financeiro, permitindo registrar entradas, saídas e acompanhar o saldo atualizado em tempo real. O foco do projeto é ensinar React, Context API, hooks, reducer, async requests, modal, estilização e boas práticas de arquitetura.
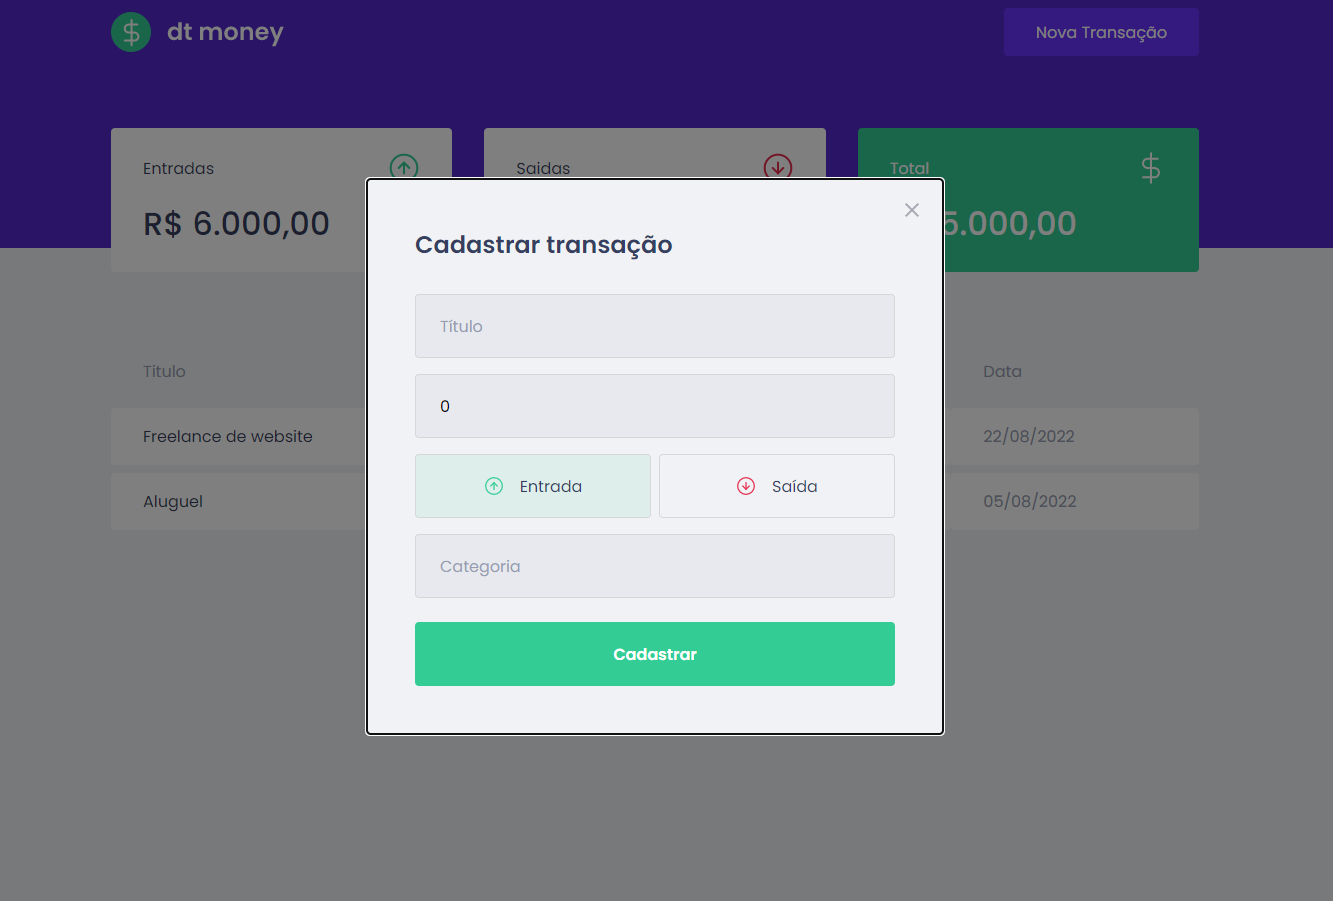
📸 Screenshots
🖼 Dashboard
🖼 Modal de Nova Transação
🚀 Tecnologias utilizadas
ReactJS — componentização e renderização
TypeScript — segurança e tipagem
Vite — ambiente de desenvolvimento moderno
Styled Components — estilos modularizados
Phosphor Icons — ícones
Context API — compartilhamento de estado global
useReducer — manipulação de estados complexos
Axios — requisições HTTP
MirageJS — API fake para desenvolvimento
React Hook Form — formulários mais eficientes
Zod — validação de dados
🧩 Principais funcionalidades
💰 Registro de transações
Inserir entradas (receitas)
Inserir saídas (despesas)
Todas registradas com:
título
categoria
valor
tipo da transação
data
🧾 Listagem de transações
Tabela completa com todos os registros
Formatação automática de valores e datas
Atualização em tempo real
📊 Resumo financeiro
Cálculo automático de:
total de receitas
total de despesas
saldo final
Renderização dinâmica com base nos dados
📥 Modal de criação
Modal estilizado para adicionar novas transações
Formulário intuitivo e com validação
Fechamento automático após criação
🔍 Busca filtrada
Campo de busca para filtrar transações
Implementado com debounce (dependendo da versão do Ignite)
🧠 Estado global estruturado
Context API + Reducer
MirageJS simulando backend
Organização clara entre lógica, estado e UI
🏁 Como executar o projeto
# Clone o repositório
git clone https://github.com/JsnEvt/JS_Finances.git

# Instale as dependências
npm install

# Inicie o servidor de desenvolvimento
npm run dev
🎯 Objetivo educacional
O DT Money reforça diversos conceitos essenciais do ecossistema React:
Context API para estado global
Reducers para lógica mais previsível
Integração com APIs (reais ou mockadas)
MirageJS para simular backend
Styled Components com tema global
Formulários profissionais com React Hook Form
Validação com Zod
Consumo de dados com Axios
Padrões avançados de organização
👨💻 Autor
Este projeto foi desenvolvido por Jason Santos, como parte das práticas do curso Ignite da Rocketseat.
MuseScore Plugins for Music Theory and Counterpoint
This is a set of practical plugins to assist with identifying intervals and chords, as well as finding errors in two-part counterpoint and four-part SATB writing. It can also generate interval, triad, and seventh chord exercise pages, and can automatically grade interval worksheets completed in MuseScore.
Latest MuseScore3 Requirement
The checker plugins have been updated to work with the latest release of MuseScore3. The SATB checker and species counterpoint checkers require MuseScore 3.5.2 or later in order to correctly read the roman numeral analysis.
Installation
Copy the included .qml files to your Documents/MuseScore3/Plugins folder. Then open MuseScore and open the Plugin Manager (in the Plugins menu). Check the boxes next to the plugins that you would like to enable. If you’re planning to use the SATB checker or the species counterpoint checkers, I receommend you assign a shortcut key.
Now when you go to the Plugins menu the counterpoint, SATB, and interval, chord, and pop chord checkers will appear under the heading “Proof Reading.” The exercise makers and checkers appear in a separate top menu called “Exercises.”
Use
SATB Part-Writing Checker
I’ve wanted to use MuseScore3’s new Roman Numeral Analysis tool with part-writing for a long time! This newly updated plugin checks four-part SATB writing, comparing it against the roman numerals to determine if the pitches are correct. It will check voice leading, range, spacing, forbidden parallels, missing chord tones, and more! I created it to find as many possible inaccuracies and style weaknesses as possible.
Roman numerals should be added with the Roman Numeral Analysis tool (Add -> Text -> Roman Numeral Analysis).
Every chord must have four voices spread across two staves, but they can be arranged in any way you want. The plugin will read them from the bottom-up.
You can use diatonic roman numerals with figured bass for inversions. You can also use borrowed chords (mode mixture), secondary chords (V7/V, for instance, or even ii7/iii!), Neapolitan, Italian/German/French augmented sixth chords, and Cadential 6/4 chords. Check the example_satb_complex sample file for details.
There are no options or settings to tweak on this version. The plugin guesses major or minor mode through a simple trick: if there are more i, iv, III, and VI
chords than I, IV, iii, and vi chords, it infers that it is minor mode.
Species Counterpoint Checker
Modal Counterpoint, Species I – III
Enter your two part counterpoint melody on a grand staff and run the plugin from the Plugins menu to check your results. If you have selected one or more measures, the plugin will only check the selected measures. If no measures are selected, it will run on the entire file.
The modal species plugins will check both the upper and lower parts for counterpoint errors. You may optionally use the lyric tool to attach the word “cf” to the staff you would like to designate the cantus firmus.
The plugin does not enforce the rhythmic conventions of species counterpoint, so there is some flexibility about the types of counterpoint it can be used to check. The rules come from Peter Schubert’s Modal Counterpoint, Renaissance Style and are generally in agreement with Tom Pankhurst’s Guide to Schenkerian Analysis, http://www.schenkerguide.com/.
Tonal Counterpoint, Species I – III
Currently being updated! (Summer 2022)
The tonal species plugins have been tested successfully with all of the examples in Seth Monahan’s excellent Two-Part Harmonic Species Counterpoint: An Introduction available at http://sethmonahan.com/TH101HarmonicCounterpoint.html. The tonal plugins evaluation procedures are derived from the rules laid out in this book.
Clearing annotations
Usually the score annotations added by any of the plugins can be removed with the undo command. Otherwise, right-click on any of the text and choose Select → All Similar Elements. The press Delete.
Once you have nfnl and a .nfnl.fnl file at the root of your project you can write to .nvim.fnl and have .nvim.lua compiled for you automatically. This file is loaded by native Neovim with zero plugins provided you have :set exrc enabled.
This means even colleagues that don’t have nfnl installed can use your directory local configuration. Consider this repo as essentially archived and superseded by this much smoother approach.
Add some Fennel code such as (print "Hello, World!") to a file named .lnvim.fnl in your current directory or anywhere above it such as your home directory. A file will be created beside the .fnl called .lnvim.lua which will be executed upon startup. Files higher up in your directory hierarchy, such as the home directory, will be executed before those found lower down, such as in a project.
Be sure to git ignore .lnvim.fnland.lnvim.lua if you don’t want to share your local configuration with others. If you do want to share a .lnvim.fnl I’d recommend you ignore the .lua file to prevent duplicated changes in git commits.
Aniseed will only re-compile the Fennel code if it’s changed since last time you opened Neovim. If you delete the .lnvim.fnl file then the .lnvim.lua file will be deleted automatically next time you launch Neovim to ensure you don’t accidentally leave Lua files laying around.
Installation
If you want interactive evaluation of the forms in your .lnvim.fnl file you can install Conjure too.
Aniseed is embedded under the nvim-local-fennel.aniseed.* module prefix, this means you can use Aniseed’s macros and functions in your .lnvim.fnl files!
;; .lnvim.fnl;; You can give the module any name you want.
(module my-local-fennel
{autoload {a nvim-local-fennel.aniseed.core
str nvim-local-fennel.aniseed.string
nvim nvim-local-fennel.aniseed.nvim}})
;; A hyphen suffix denotes a private function.
(defn-do-some-things [numbers]
(a.println
(nvim.fn.getcwd)
(a.map a.inc numbers)
{:Hello:Fennel!}))
;; Public value.;; You could require this module and access it.
(defcounting [123])
;; Executed as the file is loaded.
(do-some-things counting)
Unlicenced
Find the full unlicense in the UNLICENSE file, but here’s a snippet.
This is free and unencumbered software released into the public domain.
Anyone is free to copy, modify, publish, use, compile, sell, or distribute this software, either in source code form or as a compiled binary, for any purpose, commercial or non-commercial, and by any means.
Formulating everything you need in markdown is very light weight and efficient.
This can be an enormous productivity bust for oneself. Nevertheless one would miss the power of LaTeX
with its unique ecosystem which is perfect for writing scientific content (paper, books, presentation).
This project is using the amazing pandoc library which is the exact right tool to combine both worlds.
You can immediately get started an use my customized templates for generating nice
looking books, papers or presentations. I provide detailed steps how to use it and
how to reproduce everything. The main environment is containerized thanks to Docker.
Therefore everything can much simpler be reproduced.
What is nicer than writing in pure, simple markdown?
No worries about latex but with all the power of it!
Key Features
Feature
Implement Status
Docker image, make everything reproducible
✔️
LaTeX templates
✔️
Comprehensive python scripts
✔️
Dependencies
This enumeration also includes submodules.
For my beamer latex project I use the following latex templates:
beamerthemeawesome theme from LukasPietzschmann as a starting point and customized it for my needs.
smile theme from LukasPietzschmann as a starting point and customized it for my needs.
python3 md2pdfLib/presentation/scripts/md2beamerpdf.py 2>&1| tee data/out/beamer.log
Build book
If no glossary is needed one can just run the following command:
OUTPUT_NAME=output.pdf
python3 md2pdfLib/book/scripts/md2pdf.py $OUTPUT_NAME2>&1| tee data/out/book.log
Build book with glossary entries
For now we must invoke lualatex by ourselves if we want to print latex gloassary
entries. Therefore the workflow changes to the following:
Execute the bash script for making life easy:
# CHANGE TO OUTPUT TO .tex in this script first# then call this script to export a .tex file
python3 md2pdfLib/book/scripts/md2pdf.py 2>&1| tee data/out/book.log
# assuming the output is named book_output.tex
lualatex data/out/book_output.tex
makeglossaries book_output
makeindex book_output.nlo -s nomencl.ist -o book_output.nls
lualatex data/out/book_output.tex
lualatex data/out/book_output.tex
This project aims to provide an unique style for the pdf layouts.
Therefore I had to produce my own pandoc template.latex file.
The following steps are guiding you through the customization steps
so you can reproduce everything:
I assume you already cloned the repo and the terminal points to the directory.
Delete ignorenonframetext out of the \documentclass options.
Add custom colors right before \usetheme (in my case my favorite \definecolor{myGreenAccent}{RGB}{105, 240, 174})
Tests
Roadmap
Upcoming 🙂
Contributing
Contributions are what make the open source community such an amazing place to be learn, inspire, and create. Any contributions you make are greatly appreciated.
Fork the Project
Create your Feature Branch (git checkout -b feature/AmazingFeature)
Commit your Changes (git commit -m 'Add some AmazingFeature')
Push to the Branch (git push origin feature/AmazingFeature)
💬 If you prefer static files, import assets from the dist folder.
Examples
MyComponent.vue (using Composition API)
<template>
<divstyle="font-family: sans-serif">
<divv-if="!serial.isAvailable">Web Serial is not available. Check that this browser supports Web Serial API and this page is served with HTTPS.</div>
<divv-else>
<div>vue-serial: {{ serial.isOpen ? "is open (device is " + (serial.isConnected ? "connected)" : "disconnected)") : "is closed" }}</div>
<divv-if="serial.isOpen"><inputref="input"><button:disabled="!serial.isConnected"@click="user_send">Send to device</button></div>
<div><button:disabled="serial.isClosing"@click="user_connect">{{ !serial.isOpen ? "Connect to a device..." : "Close connection" }}</button></div>
</div>
</div>
</template>
<script setup>
// In this example we use the Vue3 "Composition API" but it works with the "Option API" as well.import { ref, watch } from'vue'importVueSerialfrom'vue-serial'constinput=ref(null); // input will contain the `<input ref="input">` element// Configure the serial settingsconstserial=newVueSerial();serial.baudRate=115200;serial.dataBits=8;serial.stopBits=1;serial.parity="none";serial.bufferSize=255; // set to 1 to receive byte-per-byteserial.flowControl="none";// Function to ask the user to select which serial device to connectasyncfunctionuser_connect () {if(serial.isOpen) awaitserial.close(); // in your application, encapsulate in a try/catch to manage errorselse {awaitserial.connect(); // can be `serial.connect([{ usbVendorId:1027 }])` to show only FTDI devicesif(serial.isOpen) {serial.startSignalsPolling(); // (optional) to listen for CTS, DCD, DSR, and RI signal events// await serial.write(...); // to send bytes to device automatically after connection } }}// Function to send the value contained in the inputasyncfunctionuser_send () {constinput_elt=input.value; // refers to <input ref="input">constvalue=input_elt.value;awaitserial.write(value); // in your application, encapsulate in a try/catch to manage errorsconsole.log("bytes sent:", value);}// This will watch for incoming dataserial.addEventListener("read", ({ value }) => { console.log("bytes read:", value); });// This will watch for CTS input signal changes (startSignalsPolling must have been called)watch(() =>serial.clearToSend, (value) => { console.log("CTS signal:", value); });
</script>
same example using static files loaded with a CDN (using Options API)
<html><head><scriptsrc="https://cdn.jsdelivr.net/npm/vue@3/dist/vue.global.prod.js"></script><scriptsrc="https://cdn.jsdelivr.net/npm/vue-serial/dist/vue-serial.umd.js"></script></head><body><divid="app"><divstyle="font-family: sans-serif"><divv-if="!serial.isAvailable">Web Serial is not available. Check that this browser supports Web Serial API and this page is served with HTTPS.</div><divv-else><div>vue-serial: {{ serial.isOpen ? "is open (device is " + (serial.isConnected ? "connected)" : "disconnected)") : "is closed" }}</div><divv-if="serial.isOpen"><inputref="input"><button:disabled="!serial.isConnected" @click="user_send">Send to device</button></div><div><button:disabled="serial.isClosing" @click="user_connect">{{ !serial.isOpen ? "Connect to a device..." : "Close connection" }}</button></div></div></div></div><script>constapp=Vue.createApp({data(){return{serial: newVueSerial()}},mounted(){// Configure the serial settingsthis.serial.baudRate=115200;this.serial.dataBits=8;this.serial.stopBits=1;this.serial.parity="none";this.serial.bufferSize=255;// set to 1 to receive byte-per-bytethis.serial.flowControl="none";// This will watch for incoming datathis.serial.addEventListener("read",({ value })=>{console.log("bytes read:",value);});},methods: {asyncuser_connect(){// Function to ask the user to select which serial device to connectif(this.serial.isOpen)awaitthis.serial.close();// in your application, encapsulate in a try/catch to manage errorselse{awaitthis.serial.connect();// can be `serial.connect([{ usbVendorId:1027 }])` to show only FTDI devicesif(this.serial.isOpen){this.serial.startSignalsPolling();// (optional) to listen for CTS, DCD, DSR, and RI signal events// await serial.write(...); // to send bytes to device automatically after connection}}},asyncuser_send(){// Function to send the value contained in the inputconstinput_elt=this.$refs.input;// refers to <input ref="input">constvalue=input_elt.value;awaitthis.serial.write(value);// in your application, encapsulate in a try/catch to manage errorsconsole.log("bytes sent:",value);}},watch: {// This will watch for CTS input signal changes (startSignalsPolling must have been called)"serial.clearToSend": (value)=>{console.log("CTS signal:",value);}}}).mount('#app');</script></body></html>
YAMI is only designed for serial PC mouses. This kind of mouse is extremely hard to find nowadays. Some PS/2 mice can be used on a serial line with a PS/2-to-serial adapter. If you are using a PS/2 mouse, make sure that your mouse does actually support such an adapter! A good hint is that the mouse came with such an adapter enclosed.
Today’s computer mouses only support USB (and a few maybe PS/2 with an adapter). Sadly, you cannot use these with YAMI. Don’t even think about connecting a USB mouse to a PS/2 adapter, and the PS/2 adapter to a serial adapter. You will most likely destroy your hardware that way.
NEVER NEVER EVER connect an Amiga or Atari mouse to YAMI. You will kill that mouse if you do so. Also do not connect Amiga or Atari joysticks to YAMI, and do not connect other serial devices to YAMI. Just because it plugs, doesn’t mean that it also plays.
In other words, if you want to be on the safe side, only connect a serial mouse to YAMI.
Actually, I had planned a YAMI2 that was designed to support USB mice. Anyhow handling USB data traffic requires more sophisticated hardware and software. The dying Amiga platform wasn’t much of a motivation for me to start the project.
Assembling the Hardware
YAMI is easily assembled if you know how to read schematics and use a soldering iron. You will find the schematic diagram and a bill of material in the “schematics” directory.
If you use an Atari ST, or if you won’t use the mouse wheel on your Amiga, you can spare the connector named “JOY”, which saves you some tedious wiring.
The YAMI hardware does some voltage tricks. Please make sure that you build the YAMI hardware exactly after the schematics. If you fail to do so, and if you’re lucky you will only damage your mouse and your YAMI hardware. With bad luck you will also destroy your Amiga or Atari vintage computer though, so be extra careful.
Check everything at least twice and then once more, before you connect YAMI for the first time.
Flashing YAMI to the PIC processor
There are two ways to flash the YAMI firmware to the PIC processor: You can either program the PIC before, or you can in-circuit program the PIC after assembling the YAMI hardware. In any case, you need a PIC programmer (e.g. PICkit).
For in-circuit programming with a PICkit you just need a spare DB9 male and female connector, and a few wires. They need to be connected like this:
PICkit Pin 1 (/MCLR) is connected to Pin 4 of the female DB9 connector
PICkit Pin 2 (VDD) is connected to Pin 7 of the male DB9 connector
PICkit Pin 3 (GND) is connected to Pin 8 of the male DB9 connector
PICkit Pin 4 (PGD) is connected to Pin 2 of the male DB9 connector
PICkit Pin 5 (PGC) is connected to Pin 1 of the male DB9 connector
This adapter is connected to the PICkit, the female connector is connected to YAMI’s “Serial” port, and the male connector is connected to YAMI’s “Mouse” port. Make sure the adapter is properly connected before plugging it in.
Configure the MPLAB IPE to power the target circuit with 5 Volts. Also turn off the “Erase All before program” option in the settings menu.
In the “dumps” directory, you will find hex dumps that are ready for being flashed into the PIC processor.
yami.hex – contains the YAMI firmware.
You also need to flash one of these EEPROM dumps, depending on your needs:
yami-eeprom-amiga.hex – AMIGA version
yami-eeprom-atari.hex – ATARI ST version
Using YAMI
Using YAMI is fairly easy.
Connect your serial PC mouse (or a PS/2 mouse with the included serial adapter) to the SERIAL port of YAMI.
Turn off your Amiga/Atari (yes, in the good old days, computers had to be turned off for that), then connect YAMI’s MOUSE connector to the mouse port of your computer. Optionally, also plug the JOY connector to the
joystick port of your Amiga.
Now turn on your computer. The PC mouse should work right from the start. No drivers are required. At least unless you want to use the mouse wheel.
For the mouse wheel, you need to install the “YamiCX” commodity. You can find the source code in the “yamiCX” directory, and a compiled binary on AmiNet.
Please do not expect the mouse wheel comfort of modern computers. AmigaOS was never designed for it, so only a few applications actually make use of it.
The Atari ST does not support mouse wheels, due to hardware limitations.
Joystick Mode
YAMI offers a special joystick mode. To use it, you will need a DB9 Y cable for each joystick. Connect the Y cable to the joystick port of your computer. On the one end of the Y cable, you connect the joystick, and on the other end you connect the appropriate YAMI port. You can also connect a second Y cable to the mouse port of your computer, in order to connect a second joystick.
Now, if you want to use the joystick, just press on its fire button. YAMI will detect that, and will turn off the mouse signals. You can start using the joystick now, without YAMI interfering.
If you want to use the mouse again, just move it. YAMI will immediately resume its work.
Please only use simple switched joysticks (like the good old Competition Pro). Do not use analog joysticks or other funny sticks. They might interfere with YAMI if you use the mouse, and they might even damage YAMI!
Building YAMI from Source
The source code can be assembled using GPUtils. Assembling the source files is easy:
cd source
gpasm yami.asm
gpasm yami-eeprom-amiga.asm
gpasm yami-eeprom-atari.asm
FAQ
Can I purchase an assembled and ready-to-use YAMI from you?
Unfortunately not. I have already sold the last stock of YAMI many years ago. I also don’t have any PCBs left.
What happens if I accidentally use the Atari ST version on an Amiga (or vice versa)?
Mouse movements will be uncontrollable, but besides that, it won’t damage your hardware.
The Mouse Wheel is not working properly on my Amiga. Why?
Make sure you have YamiCX installed and running. It converts mouse wheel movements to the proper system events. Also keep in mind that AmigaOS has never been designed for mouse wheels. Only a few programs make actual use for it.
Is there also a keyboard interface?
Actually, yes. I was working on YAKI, and it had some cool features (like reprogrammable keys). However there also have been some very annoying bugs. I was never really able to fix them because I had reached the memory limit of the PIC processor.
Disclaimer
I was myself using my YAMI interface for a decade, and I am still using it today when I get in a nostalgic mood. It proved to be very reliable, and a good companion to my Amiga. There were also a number of YAMI interfaces sold in the past, and I had never received a complaint. So I am very confident that the design of YAMI is safe.
Anyhow please be aware that this hardware has the potential to damage your good old vintage computer, especially if you use a fancy mouse, or if you make a mistake assembling the hardware or flashing the firmware.
You got the YAMI schematics, source codes and binaries free of charge. It’s a gift, and it’s even licensed under GNU Public License v3. It’s meant as a favor to all the Amiga and Atari lovers out there.
You use all this information as is, on your own risk and without any guarantees expressed or implied.
If you do not exactly know how to read the schematics, purchase the required components, build the hardware and flash the firmware, please ask someone who does.
Word GPT Plus seamlessly integrates AI models into Microsoft Word, allowing you to generate, translate, summarize, and polish text directly within your documents. Enhance your writing workflow without leaving your Word environment.
✨ Features
Multiple AI Models Support:
OpenAI API (compatible with DeepSeek and other OpenAI-compatible endpoints)
Azure OpenAI API
Google Gemini Pro API
Ollama (for local deployment)
Groq API
Agent Mode:
Supports multi-step analysis and result synthesis
Configurable analysis step limits
Built-in Templates:
Translation (40+ languages)
Text polishing and improvement
Academic writing enhancement
Content summarization
Grammar checking
Customization Options:
Save custom prompts for repeated use
Adjust temperature and max tokens
Support for proxies
Local storage for privacy
Advanced Formatting:
Automatic Word Formatting: AI responses are automatically formatted with proper Word styles (headers, bold, italic, lists, code blocks)
Multiple insertion modes (replace, append, new line)
Markdown parsing and conversion to Word formatting
🚀 Getting Started
Requirements
Software
Microsoft Word 2016/2019 (retail version), Word 2021, or Microsoft 365
To get started with Word GPT Plus, you will need to sideload the add-in into Microsoft Word.
You can find instructions provided by MicroSoft at the following link: sideload office add-ins
Go to the folder where you saved the manifest.xml file, for example C:\Users\username\Documents\WordGPT.
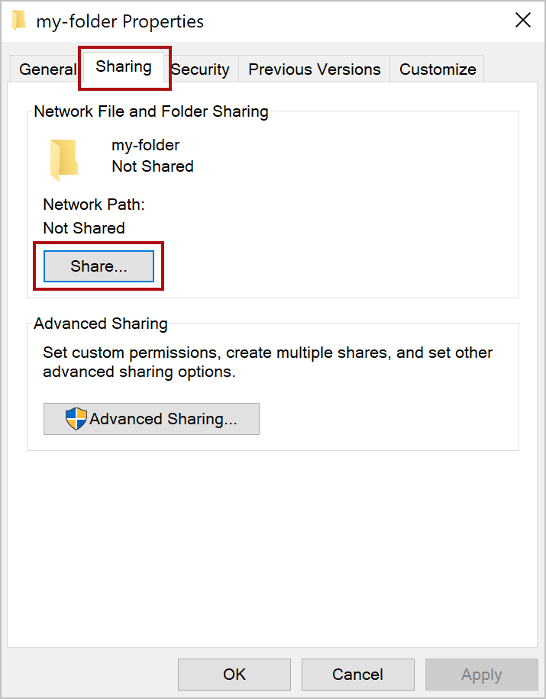
Open the context menu for the folder(right-click the folder) and select Properties.
Within the Properties dialog box, select the Sharing tab, and then select Share.
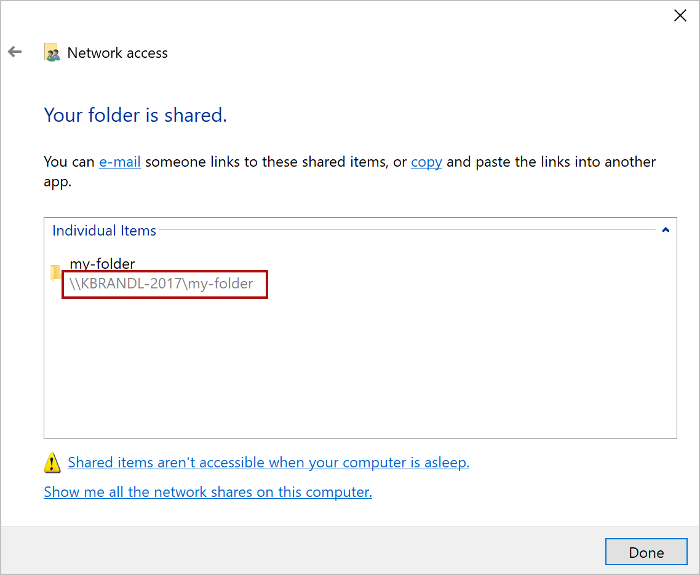
Within the Network access dialog box, add yourself and any other users you want to share, choose the Share button, When you see confirmation that Your folder is shared, note the full network path that’s displayed immediately following the folder name.
Open a new document in Word, choose the File tab, and then choose Options.
Choose Trust Center, and then choose the Trust Center Settings button.
Choose Trusted Add-in Catalogs.
In the Catalog Url box, enter the full network path and then choose Add Catalog.
Select the Show in Menu check box, and then choose OK.
Close and then restart Word.
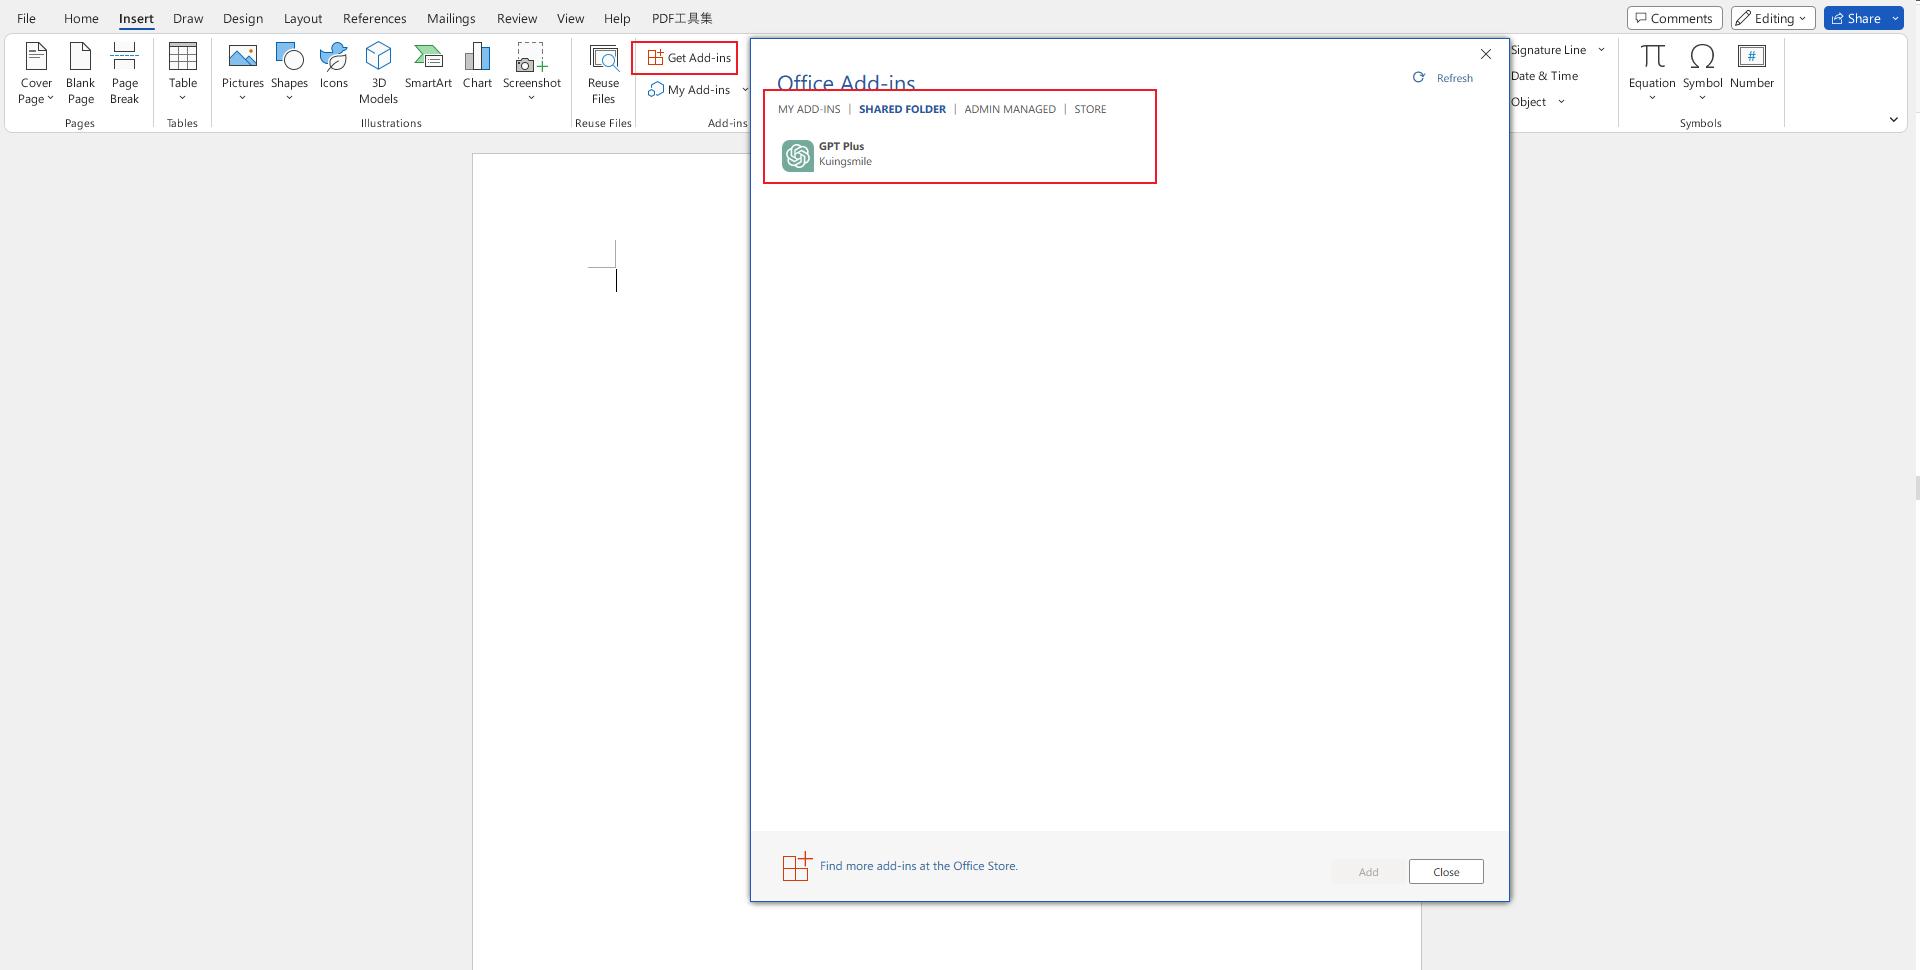
Click Insert > My Add-ins > Shared Folder, choose GPT Plus, and then choose Add.
Enjoy it!
How to fill in API key
After entering Word GPT Plus, click the orange Settings button on the homepage to enter the settings page, where you can switch APIs and fill in API keys.
Contributing
If you have a suggestion that would make this better, please fork the repo and create a pull request.


.jpg)